
| 일 | 월 | 화 | 수 | 목 | 금 | 토 |
|---|---|---|---|---|---|---|
| 1 | 2 | 3 | 4 | 5 | 6 | |
| 7 | 8 | 9 | 10 | 11 | 12 | 13 |
| 14 | 15 | 16 | 17 | 18 | 19 | 20 |
| 21 | 22 | 23 | 24 | 25 | 26 | 27 |
| 28 | 29 | 30 | 31 |
- 99클럽
- JavaScript
- 방송대컴퓨터과학과
- 방송대
- 중간이들
- aws
- Git
- 클라우드컴퓨팅
- mongoDB
- 유노코딩
- 파이썬프로그래밍기초
- 코드잇
- 프로그래머스
- 꿀단집
- 데이터베이스시스템
- 오픈소스기반데이터분석
- TiL
- Python
- node.js
- 파이썬
- 항해99
- 엘리스sw트랙
- CSS
- Azure
- 코딩테스트준비
- HTML
- redis
- nestjs
- 개발자취업
- 코딩테스트
- Today
- Total
배꼽파지 않도록 잘 개발해요
[코드잇] 자바스크립트로 리퀘스트 보내기 본문

fetch
fetch('보내고 싶은 URL');const res = await fetch(url);
// 리스폰스 상태 코드
res.status;
// 리스폰스 헤더
res.headers;
// 리스폰스 바디
await res.json(); // JSON 문자열을 파싱해서 자바스크립트 객체로 변환
await res.text(); // 문자열을 그대로 가져옴
fetch는 기본적으로 GET 리퀘스트를 보낸다.
promise를 리턴하는데, 시간이 지나고 response가 도착하면 promise는 fulfilled 상태가 되고 response를 결과값으로 갖게 된다.
그래서 response를 가져오려면 await 문을 써야함.
이 중에서 많이 사용하는 것은 상태코드, header, body임.


body 내용은 단순히 프로퍼티로 가져올 수 없고, 메소드를 사용해야 함.
body 내용이 일반 문자열이라면 text 메소드, json 문자열이라면 json 메소드를 사용해야 함.
header 중에 content-type header를 보면 사용하는 API는 json 문자열을 돌려주는 것을 알 수 있음.

json 역시 promise를 리턴하는 함수이기 때문에 앞에 await를 써줘야 함.

data 변수에 할당된 이 결과는 자바스크립트 객체이기 때문에
destructuring 같은 문법을 사용해서 데이터를 쉽게 가져올 수 있음.
const res = await fetch('http://learn.codeit.kr/api/color-surveys');
const data = await res.json();

console.log(data);

const { results } = data;
const survey = results[0];
const { id, mbti, colorCode, createdAt, updatedAt } = survey;
console.log(id, mbti, colorCode, createdAt, updatedAt)
// 141 ISTP #CA6952 1715324304000 1715324304000
- count : 모든 데이터 개수
- next : 다음 데이터를 받아오는 URL
- previous : 이전 데이터를 받아오는 URL
- results : 현재 페이지에 해당하는 데이터 배열
- offset : 건너뛸 데이터 개수
- limit : 요청하는 데이터 개수

mbti 파라미터를 사용할 수 있음.
mbti가 ISTJ인 설문 결과만 돌아옴.

쿼리스트링을 직접 사용하지 않고 url 객체를 사용할 수 있음.
const url = new URL('https://learn.codeit.kr/api/color-surveys');

url.searchParams.append('offset', 10);
url.searchParams.append('limit', 10);

const res = await fetch(url);
const data = await res.json();

console.log(data);
fetch 함수로 post, put, delete를 보낼 때
fetch 함수의 두 번째 아규먼트로 method를 설정해주면 됨.
외부로 데이터를 주고 받을 떄에는 데이터를 자바스크립트가 아닌 json으로 변환해줘야 함.
그래서 survey 데이터를 json 문자열로 변환해주어야 함.
→ json.stringify() 사용

API 함수 만들기
api.js
const base_url = new URL("https://learn.codeit.kr/api/color-surveys");

export async function getColorSurveys(params = {}) {
  // params = { offset: 5, limit: 10 };
  Object.keys(params).forEach((key) =>
    base_url.searchParams.append(key, params[key])
  );

  const res = await fetch(url);
  const data = await res.json();
  return data;
}

export async function getColorSurvey(id) {
  const url = new URL(`https://learn.codeit.kr/api/color-surveys/${id}`);
  const res = await fetch(url);
  const data = await res.json();
  return data;
}

export async function createColorSurvey(surveyData) {
  const res = await fetch(base_url, {
    method: "POST",
    body: JSON.stringify(surveyData),
    headers: {
      "content-Type": "application/json",
    },
  });

  const data = await res.json();
  return data;
}
main.js
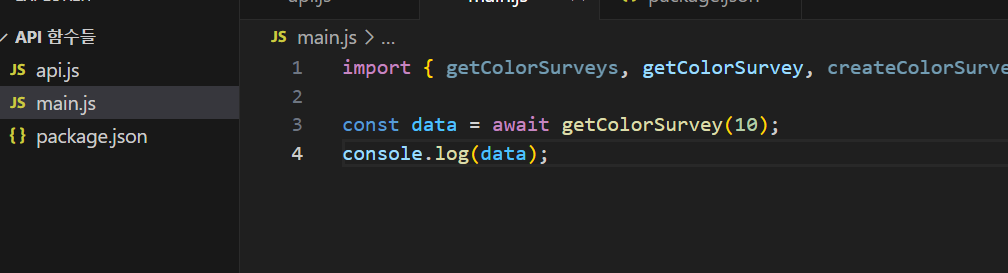
오류 처리하기
fetch 함수 안에 URL 을 잘못 입력하면 다음과 같은 오류가 난다.


웹 브라우저에서 리퀘스트 확인하기
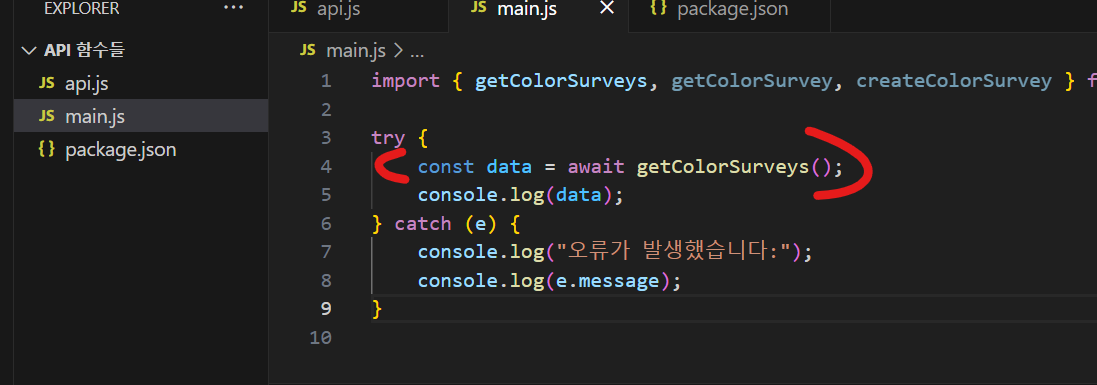
import { getColorSurveys, getColorSurvey, createColorSurvey } from "./api.js";

try {
    const data = await getColorSurveys();
    console.log(data);
} catch (e) {
    console.log("오류가 발생했습니다:");
    console.log(e.message);
}
api.js에서 fetch 함수 부분이나, main.js에서 함수를 실제로 호출하는 부분을 try-catch로 감싼다.

try안에서 throw되는 오류는 모두 잡아주기 때문에 상관이 없음.
여기서는 함수를 호출하는 부분을 try-catch로 감싸줌.
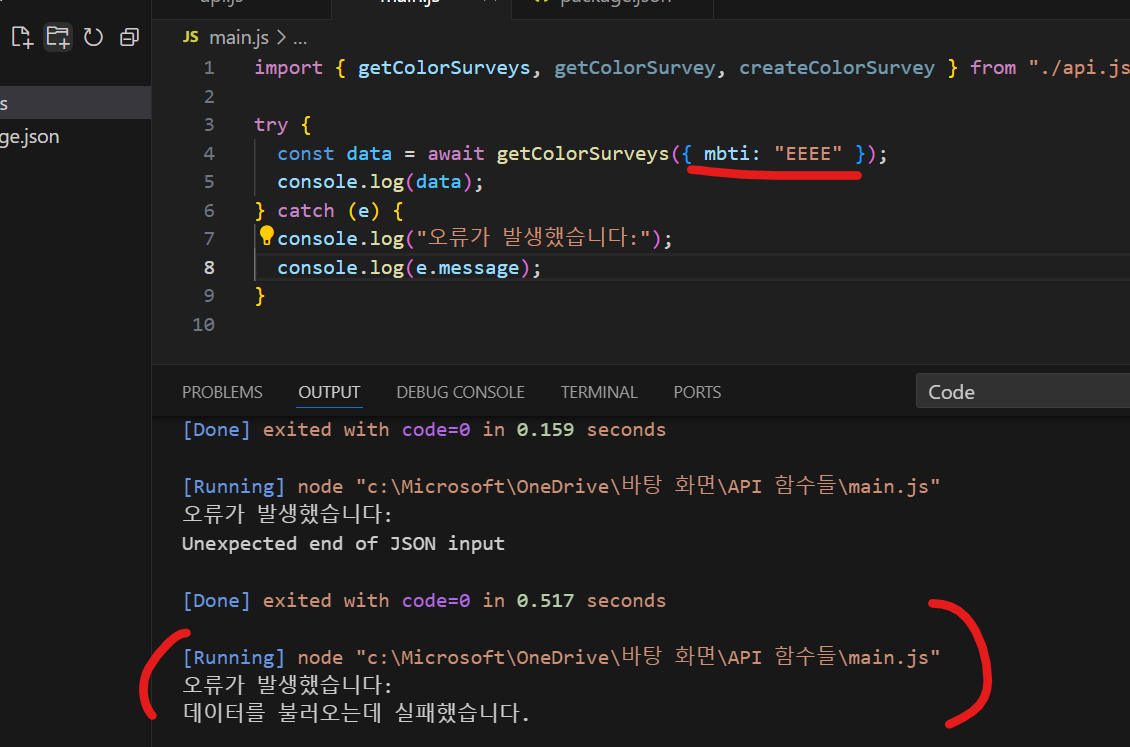
지금은 콘솔에 오류가 나오지만 실제 웹사이트 코드라고 하면 오류메시지를 화면에 보여줄 수 있음.
유효하지 않은 헤더 이름, 헤더값이 이상하면 request 자체가 실패해서
fetch가 리턴하는 promise는 rejected 상태가 됨.
주의할 점은 request 자체가 실패했을 때만 promise가 rejected가 되고,
400이나 500 같은 에러 리스폰스가 돌아오면 promise는 fullfilled 상태가 됨.
잘못된 body내용을 보내서 400 response가 돌아오거나, 서버측에서 오류가 나서 500 response가 돌아와도 fetch의 promise는 fulfilled 상태가 됨.
→ response의 상태코드가 성공을 나타내지 않으면 오류를 발생시키는 것.

res.ok는 response의 상태코드가 2로 시작하면 true, 그렇지 않으면 false를 리턴함.
if문 안에서 response의 실제 상태코드나 내용을 보고 더 세밀한 처리를 할 수 있음.
request 자체가 실패해도 오류를 throw, 오류를 나타내는 상태코드가 나와도 오류를 throw함.
fetch 오류는 크게 두 가지 경우가 있음.
1) URL이 이상함. → fetch의 promise 가 rejected 상태가 됨.
2) Header 정보가 이상해서 request 자체가 실패함.
3) request는 성공적인데 상태코드가 실패를 나타냄.
이때 2번 경우에도 수동적으로 오류를 throw 해줘야 함.
request가 성공적으로 처리되고, 성공적인 response가 돌아왔을 때 데이터를 리턴하고, 나머지 모든 경우에 오류를 발생시킴.
API를 사용하는 입장에서 try-catch로 로직을 구분할 수 있음.
결론 :
fetch에 대한 오류처리를 할 때에는 언제 promise가 reject되었는지, 어떤 내용이 request body로 돌아오는지 생각해봐라.
axios
axios는 fetch보다 문법이 간단하고 다양한 편의 기능을 보냄.
실무에서 정말 많이 사용함.
axios는 third-party 모듈이기 때문에 설치를 해줘야 됨.
import axios from "axios";

export async function getColorSurveys(params = {}) {
  const url = new URL("https://learn.codeit.kr/api/color-surveys");
  Object.keys(params).forEach((key) =>
    url.searchParams.append(key, params[key])
  );

  const res = await axios.get(url);
  return res.data;
}

export async function getColorSurvey(id) {
  const url = new URL(`https://learn.codeit.kr/api/color-surveys/${id}`);
  const res = await axios.get(url);
  return res.data;
}

export async function createColorSurvey(surveyData) {
  const url = "https://learn.codeit.kr/api/color-surveys";

  try {
    const res = await axios.post(url, surveyData);
    return res.data;
  } catch (error) {
    throw new Error("데이터를 생성하는데 실패했습니다.");
  }
}- GET 및 DELETE 요청은 첫 번째 파라미터로 url, 두 번째 파라미터로 받음.
- POST, PATCH 및 PUT 요청은 데이터를 전송하는 데 사용되는 요청 본문을 두 번째 인수로 받음.
선택적으로 세 번째 인수로 요청 옵션 객체를 받을 수 있음.
리퀘스트마다 공통되는 부분이 있으면 그것을 instance로 설정할 수 있음.
보통 경로만 다르고 앞부분은 항상 똑같음.
import axios from "axios";

const instance = axios.create({
  baseURL: "https://learn.codeit.kr/api",
  timeout: 3000,
});

export async function getColorSurveys(params = {}) {
  const res = await instance.get("/color-surveys", { params });
  return res.data;
}

export async function getColorSurvey(id) {
  const res = await instance.get(`/color-surveys/${id}`);
  return res.data;
}

export async function createColorSurvey(surveyData) {
  const res = await instance.post("/color-surveys", surveyData);
  return res.data;
}
fetch함수는 request 자체가 실패했을 때만 promise가 reject되고
400이나 500 response가 돌아왔을 때에는 promise가 reject되지 않음.
axios는 다름.
400이나 500 response가 돌아올 때에도 promise가 reject됨.
그러니까 request가 성공하고 200대의 상태코드가 가진 reponse가 돌아와야만 promise가 fulfilled가 됨.
→ 오류처리가 편하다.
axios를 호출할 때 try-catch로 감싸면 됨.
import {
  getColorSurveys,
  getColorSurvey,
  createColorSurvey,
} from "./axiosApi.js";

// "GET /color-surveys"
try {
  const survey = await getColorSurvey(123);
  console.log(survey);
} catch(e) {
  console.log('오류가 발생했습니다.');
  console.log(e.message);
}
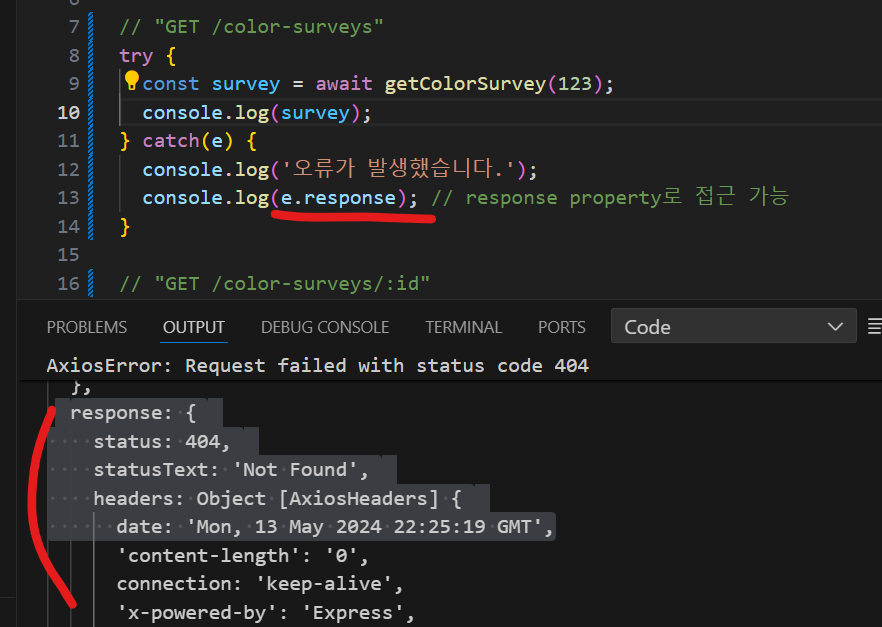
에러 객체의 메시지는 axios가 알아서 설정해줌.
이것 대신 error response body에 있는 메시지를 사용할 수 있음.
error response가 돌아오면 axios는 에러 객체에 response를 저장해줌.
import {
  getColorSurveys,
  getColorSurvey,
  createColorSurvey,
} from "./axiosApi.js";

// "GET /color-surveys"
try {
  const survey = await getColorSurvey(123);
  console.log(survey);
} catch(e) {
  console.log('오류가 발생했습니다.');
  console.log(e.response); // response property로 접근 가능
}


// "POST /color-surveys"
const surveyData = {
  mbti: "ISFP",
  // colorCode: "#123456",
  password: "0000",
};
try {
  const newColorSurvey = await createColorSurvey(surveyData);
  console.log(newColorSurvey);
} catch (e) {
  console.log("오류가 발생했습니다.");
  console.log(e.response.status);
  console.log(e.response.data);
}
e.response가 먼저 있는지 확인하는 것이 좋음
https://axios-http.com/docs/handling_errors
Handling Errors | Axios Docs
Handling Errors axios.get('/user/12345') .catch(function (error) { if (error.response) { console.log(error.response.data); console.log(error.response.status); console.log(error.response.headers); } else if (error.request) { console.log(error.request); } el
axios-http.com
에러 리스폰스 여부를 반영하여 코드를 작성하였음.
try {
  const newColorSurvey = await createColorSurvey(surveyData);
  console.log(newColorSurvey);
} catch (e) {
  if (e.response) {
    console.log(e.response.status);
    console.log(e.response.data);
  } else {
    console.log("리퀘스트가 실패했습니다.");
  }
}'코드잇 Codeit > Front-End' 카테고리의 다른 글
| [코드잇] React로 데이터 다루기 ① - 배열 렌더링, 데이터 가져오기, 입력폼 다루기 (0) | 2024.03.30 |
|---|---|
| [코드잇] CSS 레이아웃 (0) | 2024.01.31 |
| [코드잇] TypeScript 기본기 (0) | 2024.01.24 |
| [코드잇] React 웹 개발 시작하기 (0) | 2024.01.18 |
| [코드잇] 자바스크립트 모듈 (0) | 2024.01.06 |


