
| 일 | 월 | 화 | 수 | 목 | 금 | 토 |
|---|---|---|---|---|---|---|
| 1 | 2 | 3 | 4 | 5 | 6 | |
| 7 | 8 | 9 | 10 | 11 | 12 | 13 |
| 14 | 15 | 16 | 17 | 18 | 19 | 20 |
| 21 | 22 | 23 | 24 | 25 | 26 | 27 |
| 28 | 29 | 30 |
- 중간이들
- 99클럽
- mongoDB
- 방송대컴퓨터과학과
- 꿀단집
- HTML
- node.js
- JavaScript
- 데이터베이스시스템
- 클라우드컴퓨팅
- TiL
- 코드잇
- Python
- Git
- 방송대
- 파이썬프로그래밍기초
- nestjs
- Azure
- 유노코딩
- 코딩테스트준비
- 엘리스sw트랙
- 코딩테스트
- 프로그래머스
- aws
- CSS
- 데이터분석
- 파이썬
- 개발자취업
- 항해99
- 오픈소스기반데이터분석
- Today
- Total
배꼽파, 오늘도 배꼽 대신 데이터를 판다
[NestJS] 회원가입 API 만들기 (Entity 생성부터 Controller 작성까지) 본문
프로젝트 생성 후 엔드포인트가 'sign-in'인 회원가입 API를 만들어보자.
NestJS 프로젝트 생성 명령어
npm install -g @nestjs/cli
nest new project-name
현재 우리 서비스에는 회원가입과 관련된 모듈은 auth 모듈과 users 모듈로, 2개가 있다.
auth 모듈은 인증 및 인가와 관련된 기능을 담당하고, users 모듈은 회원 관리와 관련된 기능을 담당한다.
먼저 회원 정보를 저장할 Users 엔티티를 생성한다.
API 개발은 다음과 같은 순서로 진행될 것이다.
1. Entity 정의
2. 의존성 주입 (DI, Dependency Injection)
3. DTO 설계
4. Service 구현
5. Controller 구현
1. Entity 정의
우선 'users' 모듈 안에 정의된 'Users' 엔티티를 'auth' 모듈의 서비스에서 사용해야 한다. 이를 위해 데이터베이스와 상호작용할 Users 엔티티를 먼저 생성해야 한다.
Users 엔티티는 MySQL의 테이블과 매핑되며, 회원 정보를 저장한다. TypeORM을 사용하면, 엔티티 클래스에 정의된 속성에 따라 MySQL의 컬럼이 자동으로 생성된다.
따라서 TypeORM의 엔티티를 정의하여 데이터베이스의 테이블 구조와 컬럼을 자동으로 관리할 수 있다.
users.entity.ts
import {
  Column,
  CreateDateColumn,
  Entity,
  PrimaryGeneratedColumn,
} from 'typeorm';
import { EMembershipStatus, EStudentStatus } from '../enums';

@Entity('users')
export class UsersEntity {
  @PrimaryGeneratedColumn()
  // 회원 고유 ID 값
  userId: number;

  // 이름
  // 회원 실명 OCR에서 추출
  @Column({ length: 8 })
  username: string;

  // 닉네임
  @Column({ length: 8 })
  nickname: string;

  // 이메일
  @Column()
  email: string;

  // 비밀번호
  @Column({ length: 16 })
  password: string;

  // 회원 가입 인증 상태
  @Column({
    type: 'enum',
    enum: EMembershipStatus,
    default: EMembershipStatus.NON_MEMBER,
  })
  membershipStatus: EMembershipStatus;

  // 재학생 졸업생 여부
  @Column({
    type: 'enum',
    enum: EStudentStatus,
    default: EStudentStatus.CURRENT_STUDENT,
  })
  studentStatus: EStudentStatus;

  // 인증서류 (URL string)
  @Column()
  certificationDocumentUrl: string;

  // 가입일
  @CreateDateColumn()
  createdAt?: Date;

  // 활동 정지 종료 날짜
  // 기본 상태 null, 정지되었으면 정지가 종료되는 날짜
  @Column({ type: 'timestamp', nullable: true, default: null })
  suspensionEndDate?: Date;

  // 탈퇴일
  // 탈퇴하지 않은 null, 탈퇴하면 날짜
  @Column({ type: 'timestamp', nullable: true, default: null })
  deletedAt?: Date;
}
MySQL 워크벤치에서는 다음과 같이 보인다.

- @PrimaryGeneratedColumn() : 기본키의 값이 자동으로 증가하는 컬럼이다.
- @PrimaryColumn() : 기본키이지만 값이 자동으로 증가하지 않는다.
- @PrimaryGeneratedColumn('uuid') : UUID로 유일한 식별자를 생성하는 컬럼이다. 전 세계적으로 유일한 값을 생성하므로 여러 시스템 간의 충돌을 피할 수 있어서 분산시스템에서 유용하다.
  @PrimaryGeneratedColumn()
  // 회원 고유 ID 값
  userId: number;
@Column 데코레이터는 TypeORM에서 데이터베이스 테이블의 컬럼을 정의할 때 사용한다.
데코레이터에는 여러 옵션을 사용할 수 있으며, 각 옵션은 데이터베이스 테이블의 컬럼 속성을 조정한다.
@Column({ length: 8 })
username: string;
위 코드에서 username 컬럼의 길이는 8자로 제한이 되었다.
TypeORM의 @Column 데코레이터에서 length 옵션을 사용하면 MySQL에서 해당 타입이 VARCHAR 타입으로 지정된다.
length는 문자열 컬럼의 최대 길이를 지정한다.
Column의 옵션
- type : 데이터 타입 지정 (varchar, int, timestamp)
- length : 문자열 타입의 컬럼에서 길이를 설정
- nullable : true로 설정하면 이 컬럼이 NULL값을 허용함. 기본값은 false임.
- default : 기본값을 설정함.
선택적 속성(Optional Properties)
여기서 suspensionEndDate의 속성이 Date 타입일 수도 있고, undefined로 존재하지 않을 수도 있다.
회원의 활동정지가 끝나는 기한을 담았다. 이는 if (user.suspensionEndDate)로 조건부로직을 구현하기 위함인데, 사실 typeOrm과 RDB를 처음 써봐서 이렇게 쓰는게 맞는지 잘 모르겠다.
  @Column({ type: 'timestamp', nullable: true, default: null })
  suspensionEndDate?: Date;
다양한 데코레이터 종류는 여기서 알 수 있다.
https://orkhan.gitbook.io/typeorm/docs/decorator-reference
Decorator reference | typeorm
Marks your model as an entity. Entity is a class which is transformed into a database table. You can specify the table name in the entity: This code will create a database table named "users". View entity is a class that maps to a database view. expression
orkhan.gitbook.io
enum의 경우에는 아래처럼 TypeScript의 enum을 지정해서 넣어주어도 되고, enum: ['a', 'b']처럼 배열의 원소로 직접 지정해도 된다. 지정된 값들 중 하나라는 의미이다.
  // 재학생 졸업생 여부
  @Column({
    type: 'enum',
    enum: EStudentStatus,
    default: EStudentStatus.CURRENT_STUDENT,
  })
  studentStatus: EStudentStatus;
2. 의존성 주입 (DI, Dependency Injection)
AuthModule에서 UsersEntity를 주입해서 쓸 수 있다. 현재 AuthModule은 아래와 같은 상황이다.
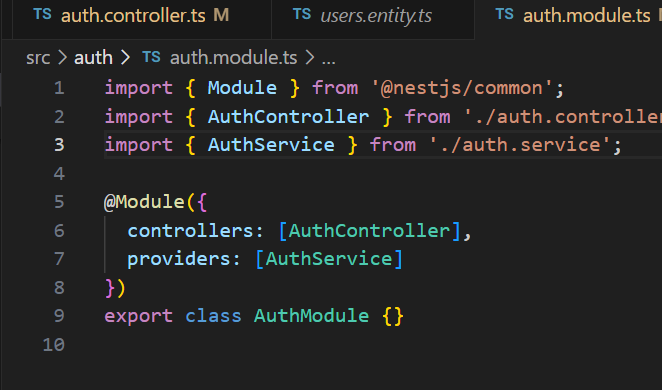
여기에 ' imports: [TypeOrmModule.forFeature([UsersEntity])] '라는 한 가지 코드를 추가해준다.
@Module({
  imports: [TypeOrmModule.forFeature([UsersEntity])],
  controllers: [AuthController],
  providers: [AuthService]
})
export class AuthModule {}
- imports : 다른 모듈을 현재 모듈에서 사용할 수 있도록 가져온다. import로 다른 모듈을 주입하게 되면 그 모듈 안에 있는 컨트롤러와 서비스를 모두 사용할 수 있다.
- TypeOrmModule.forFeature([UsersEntity]) : TypeORM을 사용하는 데 필요한 설정이다. Entity나 Schema를 가져올 때 import안에 이런식으로 작성한다. 이를 통해 AuthModule에서 UsersEntity를 데이터베이스와 상호작용하는 데 사용할 수 있다.
- controllers: [AuthController] : 해당 모듈 안에 있는 컨트롤러들을 적어준다.
- providers: [AuthService] : 비즈니스 로직을 처리하는 해당 모듈의 서비스들을 넣어준다.
이것이 바로 의존성 주입(Dependency Injection, DI)이다. 컴포넌트가 필요한 의존성을 외부에서 주입받고 이를 통해 컴포넌트 간의 결합도를 낮추고 유연성을 높인다.
3. DTO 설계
DTO (Data Transfer Object)는 데이터 전송 목적으로 사용되는 객체로, 클라이언트와 서버 간의 데이터 전송을 간소화하고 구체화한다. DTO는 데이터의 유효성을 검사하고, 전송할 데이터의 구조를 정의한다.
서비스 메소드를 작성하기 전에 DTO를 작성해야하는 이유는 클라이언트가 넘겨주는 데이터가 DTO 형식에 맞게 담겨서 오고 그것이 컨트롤러와 서비스를 거쳐가기 때문이다.
create-user-dto.ts
import { EStudentStatus } from "src/users/enums";
import { IsEnum, IsString, Length, Matches } from 'class-validator';
import { validationMessages } from "../interfaces/validation-messages";

// Regex
const NICKNAME_REGEX = /^[A-Za-z가-힣]{2,8}$/;
const EMAIL_REGEX = /^[^\s@]+@[^\s@]+\.[^\s@]+$/;
const PASSWORD_REGEX = /^(?=.*[a-z])(?=.*[A-Z])(?=.*\d)(?=.*[!@#$%^&*?_]).{8,16}$/;

export class CreateUserDto {
    // 닉네임
    // 한글 또는 영문 2~8자 (숫자 및 특수문자 불가)
    @IsString()
    @Length(2, 8)
    @Matches(NICKNAME_REGEX, { message: validationMessages.nickname } )
    readonly nickname: string;

    // 이메일
    // 이메일 정규식
    @IsString()
    @Matches(EMAIL_REGEX, { message : validationMessages.email })
    readonly email: string;

    // 비밀번호
    // 8 ~ 16자, 영문 대문자, 소문자, 숫자, 특수문자 각각 1개씩 포함
    // 특수문자는 '!@#$%^&*?_'만 가능
    @IsString()
    @Matches(PASSWORD_REGEX, { message: validationMessages.password })
    readonly password: string;

    // 졸업생/재학생 여부
    @IsEnum(EStudentStatus, { message: validationMessages.studentStatus})
    readonly status: EStudentStatus;

    // 인증서류 링크
    @IsString()
    readonly certificationDocumentUrl: string;
}
데코레이터의 역할
- @IsString() : 해당 속성이 문자열인지 확인한다.
- @Matches(pattern: RegExp, validationOptions?: ValidationOptions) : 정규 표현식을 사용하여 문자열을 검증한다.
- @IsEnum(enum) : enum 타입의 값인지 검증한다.
readonly 속성을 사용하는 이유
readonly 속성은 타입스크립트에서 객체의 속성을 수정할 수 없도록 한다. DTO 인스턴스가 생성된 후에 해당 값이 변경되지 않도록 한다. 데이터 전달이 목적이기 때문에 불변성을 유지하여 안전성을 높인다.
@Matches의 인자로 들어가는 옵션 중 { message: ~~ }는 interface 타입을 생성하여 집어넣었다.
| validation-messages.ts | validation-messages-interface.ts |
 |
 |
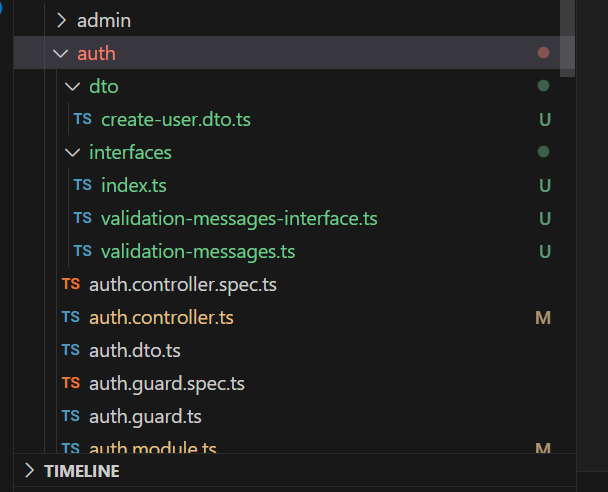
현재 auth 모듈의 구조는 다음과 같다.
4. Service 구현
AuthService는 사용자 생성과 관련된 비즈니스 로직을 처리한다. 쉽게 말하자면 새로운 회원을 생성하고 데이터베이스를 추가하는 것, 비밀번호를 해시화하는 것 등의 모든 기능들을 이곳에서 작성하면 된다.
참고로 본문에서 에러처리는 별도로 하지 않았다. 이것까지 다 해주면 글의 길이가 너무 길어져서 우선 기본 로직만 적어보았다.
auth.service.ts
import { Injectable } from '@nestjs/common';
import { InjectRepository } from '@nestjs/typeorm';
import { UsersEntity } from 'src/users/entities/users.entity';
import { Repository } from 'typeorm';
import { CreateUserDto } from './dto/create-user.dto';
import * as bcrypt from 'bcrypt';

@Injectable()
export class AuthService {
    constructor(
        @InjectRepository(UsersEntity)
        private readonly userRepository: Repository<UsersEntity>
    ){}
    // 회원 생성
    async createUser(createUserDto: CreateUserDto): Promise<void>{
        // 입력받은 평문 비밀번호를 해시화
        const hashedPassword = await this.createPassword(createUserDto.password);

        // 새로운 회원 생성
        const newUser = this.userRepository.create({
            ...createUserDto,
            password: hashedPassword,
        })

        // 생성한 회원을 DB에 저장
        await this.userRepository.save(newUser);
    }

    // 비밀번호 생성
    async createPassword(plainPassword: string): Promise<string> {
        const hashedPassword = await bcrypt.hash(plainPassword, 15);
        return hashedPassword;
    }
}
AuthService 클래스 정의
@Injectable()
export class AuthService {
    constructor(
        @InjectRepository(UsersEntity)
        private readonly userRepository: Repository<UsersEntity>
){}- @Injectable() : 해당 클래스가 NestJS의 의존성 주입 시스템에서 관리될 수 있도록 한다.
- constructor : AuthService의 생성자로 userRepository를 @InjectRepository(UsersEntity) 데코레이터를 통해 주입 받는다. 이전에 생성한 UsersEntity와 관련된 데이터베이스 작업은 userRepository가 처리한다.
createUser 메서드
async createUser(createUserDto: CreateUserDto): Promise<void>{
    // 입력받은 평문 비밀번호를 해시화
    const hashedPassword = await this.createPassword(createUserDto.password);

    // 새로운 회원 생성
    const newUser = this.userRepository.create({
        ...createUserDto,
        password: hashedPassword,
    });

    // 생성한 회원을 DB에 저장
    await this.userRepository.save(newUser);
}
클라이언트로부터 입력받는 CreateUserDto를 사용하여 새로운 회원을 생성한다.
크게 비밀번호 해시화, 회원 생성, 저장 이렇게 세 가지 부분으로 되어 있다.
이때 비밀번호 해시화는 메서드를 별도로 생성하여 호출하였다. 이렇게 기능별 메서드를 분리하지 않으면 나중에 다른 기능을 추가할 떄 매우 불편해진다. 재사용성과 확장성을 위해서라도 꼭 분리를 해야한다.
createPassword 메서드
async createPassword(plainPassword: string): Promise<string> {
    const hashedPassword = await bcrypt.hash(plainPassword, 15);
    return hashedPassword;
}
bcryt 라이브러리를 사용하여 평문 비밀번호를 해시화된 비밀번호로 바꿔준다.
plainPassword는 사용자가 입력한 비밀번호 원문이고, 15는 salt rounds로 숫자가 클수록 보안이 강화되면서 연산 시간이 증가한다.
5. Controller 작성
컨트롤러는 HTTP 요청을 처리한다. 클라이언트로부터 들어오는 요청을 수신하고, 서비스의 메서드를 호출하여 해당 결과를 클라이언트에게 반환하는 것이 컨트롤러의 역할이다.
AuthService를 주입해서 this.authService.메서드명 이런식으로 갖다 쓰면 참 편하다.
auth.controller.ts
import { Body, Controller, HttpCode, HttpStatus, Post } from '@nestjs/common';
import { AuthService } from './auth.service';
import { CreateUserDto } from './dto';

@Controller('auth')
export class AuthController {
    constructor (
        private readonly authService: AuthService,
    ) {}

    // 회원가입
    @Post('sign-up')
    @HttpCode(HttpStatus.CREATED)
    async signUp(@Body() createUserDto: CreateUserDto): Promise<{ message: string}> {
        await this.authService.createUser(createUserDto);
        return { message: "회원가입이 성공적으로 완료되었습니다."}
    }
 }
AuthController 클래스 정의
@Controller('auth')
export class AuthController {
    constructor(
        private readonly authService: AuthService,
    ) {}
}- @Controller('auth') : AuthController라는 클래스를 컨트롤러로 지정한다. 중요한 것은 이 클래스 내의 모든 메서드는 기본 경로 '/auth'에서 시작한다는 것이다. 예를 들어, @Post('sign-up')은 /auth/sign-up이 엔드포인트가 된다.
- constructor(private readonly authService: AuthService) : AuthController 인스턴스가 생성될 때 AuthService를 주입받는다. AuthController는 AuthService를 직접 생성하지 않고, NestJS가 관리하는 인스턴스를 직접 사용한다.
sign-up 경로로 오는 POST 요청을 처리하는 메서드
    // 회원가입
    @Post('sign-up')
    @HttpCode(HttpStatus.CREATED)
    async signUp(@Body() createUserDto: CreateUserDto): Promise<{ message: string}> {
        await this.authService.createUser(createUserDto);
        return { message: "회원가입이 성공적으로 완료되었습니다."}
}- @Post('sign-up') : signUp 메서드가 HTTP POST 요청을 처리하도록 지정한다. URL 경로가 'sign-up'인 POST 요청이 이 메서드로 라우팅된다.
- @HttpCode(HttpStatus.CREATED) : 이 핸들러가 성공적으로 요청을 처리할 때 응답코드로 '201 Created'를 반환한다.
- async signUp(@Body() createUserDto: CreateUserDto): Promise<{ message: string }> : 비동기적으로 회원가입 요청을 처리한다.
'BackEnd > Express / NestJS' 카테고리의 다른 글
| [NestJS] service 클래스 내에서의 함수 분리의 중요성 (0) | 2024.08.26 |
|---|---|
| [NestJS] Express의 Request 타입을 전역적으로 사용하는 방법 (0) | 2024.08.26 |
| [NestJS] res.cookie를 사용하기 위해 Express의 Response를 import 해야함 (0) | 2024.08.26 |
| [NestJS] 객체를 Redis에 저장할 때 발생한 TypeScript 오류 해결 (0) | 2024.08.26 |
| [NestJS] 문자열을 사용한 NestJS 의존성 주입시 주의할 점 (0) | 2024.08.26 |


